How to use the snipping tool on your Chromebook
Taking a screenshot can be done using the snipping tool on your Chromebook, the snipping tool has cool features, here is how to use it.
First, note that the snipping tool is way better if the newer versions of the Chromebooks that it is used to be. Be sure to keep your Chromebook up to date to enjoy the best features of the snipping tool. You can check that your Chromebook is up to date by going to the Settings app in the About menu, it’s the last menu on the left of the Settings app.
Where to find the Snipping tool on your Chromebook

- Click on the time at the bottom right of your Chromebook screen
- Click on the screen capture button
- That’s it, the snipping tool opened. You can close the tool by pressing the escape key anytime. Let’s see what are the different options now.
The different options of the Snipping tool on Chromebook
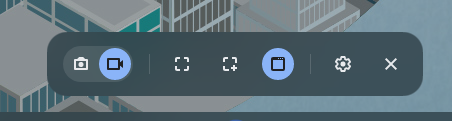
Once you opened the snipping tool on your Chromebook, a new toolbar will appear at the bottom of your screen. This toolbar allows you to select different modes. I have tried every option and will explain each one of them.

Full screenshot with snipping tool on Chromebook
To be able to screenshot the entire screen of your Chromebook with the snipping tool, you need to choose the first option on the toolbar. Once you selected the full-screen option, you just need to click anywhere to screenshot your entire screen.
You can also screenshot your entire screen by using a keyboard shortcut. Press the keys Ctrl + Show Windows or Ctrl + F5 depending on your keyboard. The Show Windows key is the sixth one from the left at the top of your keyboard, it is representing a bunch of windows.
Partial screenshot with snipping tool on Chromebook
The second option is the partial screenshot, which means that you will be able to select only a part of your screen that you want to screenshot by drawing a rectangle on your screen.
- Open the snipping tool
- Click on the icon in the middle of the snipping toolbar.
- Draw a rectangle on your screen to select the delimitation of your screenshot
- Click on Capture to take the screenshot, the image will be saved under your Downloads
You can also use a shortcut to access this partial screenshot option of the snipping tool much faster. Press the keys Ctrl + Shift + Show Windows or Ctrl + Shift + F5 depending on your keyboard configuration.
Window screenshot with snipping tool on Chromebook
The last option allows you to screenshot the active window, all of this window but not more. It’s faster than using the partial screenshot option if you don’t want to screenshot your full screen but only one opened window.
- Open the window that you want to screenshot
- Open the snipping tool
- Click on the last of the three available options to choose the windows screenshot one
- Click on the window you want to screenshot. Not that you can screenshot another window than the active one as far as you can click on it.
Once again, a shortcut exists to do a screenshot of a window faster. Press the keys Ctrl + Alt + Show Windows or Ctrl + Alt + F5 if your keyboard does not have a show window key. Once you pressed the keys, the snipping tool will be opened with the window screenshot option already selected, all you have to do is to select the window you want to screenshot.
As you might have seen, there are still a few icons that I did not spoke about yet on the snipping toolbar. These left icons are useful to record your screen, continue the reading to learn more about it.
How to record your screen with the snipping tool on Chromebook
Once you know how to use the snipping tool on your Chromebook to make screenshots, recording your screen is not a big deal.
- Open the snipping tool
- Select recording by clicking on the video icon just as the above image shows you
- Select the mode as you would do in a screenshot
- Start the recording depending on the mode you choose
- With the full-screen option, click anywhere on your screen to start the recording
- With the partial option, first, draw the rectangle to select the recording zone and then click on the Record button
- With the window option, click on the window you want to record to start the recording
- A 3 seconds countdown will start and the record will start at the end of the countdown.
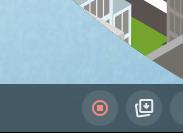
- To stop the recording, click on the Stop button at the bottom right of your screen (see the image below)
Unfortunately, there is no shortcut that you can use to start the recording of your screen on your Chromebook faster. To start the recording using a shortcut, use the same shortcut as for a screenshot depending on the snipping tool mode that you want to use, and select the record option before taking the screenshot or starting the record.
Record both the screen and your voice with the snipping tool
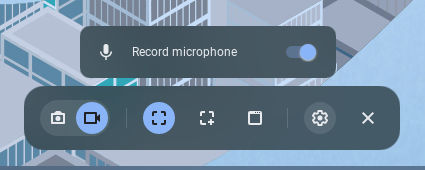
By default when you record your screen on a Chromebook, the voice coming from the microphone is not recorded. To be able to record your voice, you need to enable the option on the snipping toolbar before starting the recording.
- Open the snipping tool
- Select the recording option
- Select the mode you want to use
- Click on the settings wheel at the right of the snipping toolbar and enable “Record microphone”. See the image below.
Where are saved the screenshots on your Chromebook?
All the screenshots or records you made are saved in your Downloads directory. Open the Files application on your Chromebook, go to “My Files” and then double-click on Downloads to open the directory.
The saved screenshots and records are not deleted automatically, so remember to delete some of the files in this or to move them to a CD drive or a USB key. It will free up space on your Chromebook.
Conclusion
You are now an expert on the Chromebook snipping tool and will be able to use it to share all or part of your screen. Try to remember the shortcuts to be able to make your screenshots and records faster especially if you will have to do a lot of them.
To be able to remember them and to find all the available shortcuts on your Chromebook, search for the application “shortcuts” and open it. There are a lot of available shortcuts so make sure to use the search bar at the top of the application.
Author

Maxime Levesque is a technical engineer with more than 5 years of professional experience. He is an expert in computer and phones, mostly on Apple products. Maxime is also the founder of TechBrowser.


Post your comment