Where is the control panel on Chromebook?
Chromebook has an operating system very different from Windows but has a control panel interface. I’ve made my research and I’m sharing with you how to find it and which settings are available.
The control panel is a feature specific to Windows, this feature does not exist on other operating systems such as Chromebook. But there still have an interface that looks like a control panel on Chromebook. The application that looks like the control panel is named Settings on Chromebook. Follow the steps below to find it.
How to find the control panel on Chromebook?
As said before, the application containing the control panel on Chromebook is named Settings. To find the control panel in Chromebooks:
- Start your computer and sign in to your Chromebook.
- Click on the launcher button, at the bottom left of your screen.

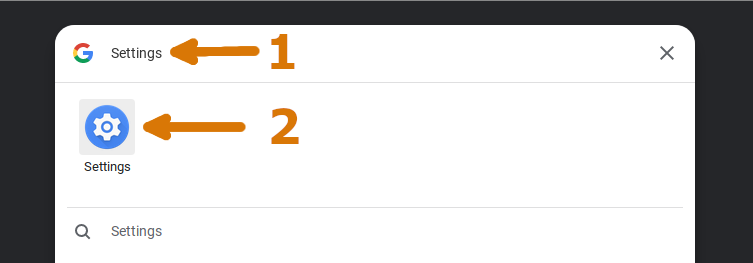
- Search for Settings in the Google search bar, and then click on the Settings application. This is the application where the control panel is in Chromebooks.

- That’s it! You are now in the control panel of your Chromebook. To find the setting you are looking for, check what is inside each menu of the settings application below.
What are the settings available in the Chromebook control panel?
It might be tough to find the setting you are looking for in all these menus of the Chromebook control panel. I have checked every menu myself to know better what you can find in each menu. Here are my findings.
Network
In the network menu, you will be able to manage all your network connections such as the Wi-Fi ones. To be able to connect to a new Wi-Fi, you will need to go into these network settings.
Bluetooth
Here you can enable or disable Bluetooth on your Chromebook, if you are not using it, I recommend disabling the Bluetooth for security reasons. In this menu, you will be able to connect any of your devices using Bluetooth once you enabled it.
Connected devices
The connected devices menu is one of the most useful settings on your Chromebook. In this menu you can connect to your Android phone, by connecting it you will be able to access your phone messages and files directly from your Chromebook.
People
This menu is used to add more profiles on your Chromebook, if different people are using the computer, each one should use its own Google account. You can manage all the accounts added to your Chromebook in the People menu.
Device
This menu is probably the one that looks the most to the control panel on Windows, you can manage a lot of settings such as keyboard language, mouse speed, or screen resolution. You can also check which application is using space on your device and manage the power settings to save battery.
Personalization
In the personalization menu, you can change your profile image or the wallpaper of your Chromebook, these settings are specific to each profile. It means that changing the wallpaper on your profile won’t affect the wallpaper of the other accounts.
Search and Assistant
Here you can change the search engine used on your Chromebook. By default, Google is selected but do not hesitate to try DuckDuckGo to increase your privacy protection or Ecosia to plant trees as you are browsing the web. You can also enable and configure Google Assistant, a very useful feature if you have many connected devices in your home.
Apps
Finally, the apps menu will contain the settings of each of your apps. So this menu is depending on the applications installed on your Chromebook, but if you want to change something with one of your apps, you can do it here.
Advanced settings
There are more settings not displayed in the basic settings of your control panel hidden under the advanced settings. I won’t dig into the detail here, but if you did not find the setting you were looking for, check these advanced settings, it might be there.
You will find settings about language, privacy, date, and time but you will be also able to configure and manage your printers or reset all the settings of your Chromebook.


Post your comment