How to fix can't resolve DNS on Chromebook
This issue on Chromebook is more common than you think, I will explain what it means and what you can try to fix it.
To fix the issue Can’t resolve DNS on Chromebook, here is 3 ways to fix it, which are detailed in this post:
- Change the DNS server
- Flush the DNS on your Chromebook
- Use a VPN to get around the issue

What does mean the issue can’t resolve DNS on Chromebook?
This issue is saying that the domain name you are trying to reach can’t be resolved to an IP address by the DNS server, or that the DNS server is not reachable. I know you are still confused, but I need to go deeper for you to understand better. Let’s first see what is a DNS exactly, and then how a DNS request is working.
DNS explained
To reach a website, you’re entering the domain name of the website into the URL bar of Google Chrome to browse the homepage. But the web server where the website is stored only has an IP address. All the network requests made between computers and servers are using the IP address to reach each other, everyone has an IP address, you can find yours on myip.com for example.
But an IP address is not an easy way for a human to read and use it, so the domain name has been created to make the process easier and better. Instead of entering the IP address of the web server, you only need to know the domain name of the website you want to reach, and it has improved the protocol as one IP address can be reached with multiple domain names.
The path of a DNS request
For your computer to know to which IP address it needs to send a web request when you are trying to reach a website using its domain name, it needs to make a DNS request and resolve the domain name.
Your Chromebook will send a request to a DNS server, asking which IP address is linked to the domain name you entered in Google Chrome. The DNS server has the address book of every computer and know can answer the request of your Chromebook, giving the IP address. This process is called a DNS resolution.
How to fix the can’t resolve DNS issue on Chromebook
Now that we understand what the issue means, let’s see 3 solutions to fix it.
Change the DNS server
The first thing to do is to change the DNS server used on your Chromebook. Indeed if the DNS can’t be resolved, it’s probably because of an issue with the DNS server itself, it might not be able to find to which IP address the DNS resolved while some other DNS server can.
The most famous DNS servers are the servers from Google, as it’s one of a company with the higher network resources, their DNS servers are considered safe and powerful.
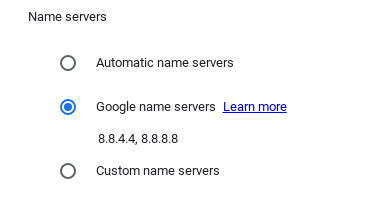
To change the DNS server on Chromebook:
- Open the Settings application, the control panel of your Chromebook
- Under the Network section, click on Wi-Fi or Ethernet depending on the connection you are using.
- Click on Network
- Under the Name servers section, select “Google name servers”
You are now using the DNS servers of Google, restart Google Chrome and try again to reach the website on which you could not resolve DNS.
Flush the DNS cache
Another way to fix the issue is to flush or reset the DNS cache on your Chromebook. Unlike clearing the SSL state on Chrome, as you are using Google Chrome on Chromebook, you want to flush the DNS cache directly on Chrome. Clearing the cache will ensure that your Chromebook will ask for a new DNS resolution the next time you will browse a website.
To reset the DNS cache on Google Chrome on your Chromebook, follow these steps:
- Open Google Chrome
- In the URL bar, enter
chrome://net-internals/#dns - Click on the button “Clear host cache”, it will flush the DNS cache on Chrome
- You also need to flush the opened sockets, in the URL bar enter
chrome://net-internals/#sockets, or click on Sockets on the menu on the left of the previous page. - Click on the button “Flush socket pools”
That’s it, the DNS cache has been cleared. Try again to reach the website, your Chromebook will DNS resolve the domain name.
Use a VPN
The last thing you should do to fix the issue is to use a VPN. The Can’t resolve DNS issue might be because of an issue on your Internet Service Provider (ISP). By using a VPN, you will bypass the network of your ISP and therefore get around any potential issue. A VPN is always useful, it can help to fix a lot of issues such as the You’re offline Check your Connection issue on YouTube.
I use a VPN called ProtonVPN and I really love it, the application is easy to use and the connection is fast. To access all the features such as fast and secure servers you will need to pay for it but there is a free version that you can try.
Author

Maxime Levesque is a technical engineer with more than 5 years of professional experience. He is an expert in computer and phones, mostly on Apple products. Maxime is also the founder of TechBrowser.


Post your comment