How to Record ASMR with an iPhone in 2024
In the world of content creation, ASMR has become a fascinating and popular genre. The subtle, soothing sounds that define ASMR (Autonomous Sensory Meridian Response) content require precise and high-quality recording techniques.
In the world of content creation, ASMR has become a fascinating and popular genre. The subtle, soothing sounds that define ASMR (Autonomous Sensory Meridian Response) content require precise and high-quality recording techniques.
To record a podcast on your iPhone you will need:
- An external Microphone
- A recording application
- Tools for ASMR noises
Understanding ASMR and its Requirements
Before diving into the recording process, it's essential to understand what makes good ASMR content. ASMR videos are all about triggering a relaxing, tingling sensation in viewers through specific auditory stimuli. Common ASMR triggers include whispering, tapping, scratching, and ambient noises.
The key to effective ASMR content is clarity and subtlety in the sounds. Therefore, the recording process plays a pivotal role.
Step-by-Step Guide to Recording ASMR with an iPhone
Step 1: Choosing the Right Environment
Firstly, find a quiet and controlled environment. Background noise can be a significant detriment to ASMR quality. A quiet room with minimal echo is ideal.
Step 2: Setting Up Your iPhone
Ensure your iPhone is in a stable position. Using a tripod or a steady surface can prevent any unwanted movement or handling noise.
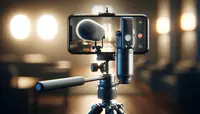
Step 3: Using External Microphones
While the iPhone's built-in microphone is decent, for high-quality ASMR, consider using an external microphone. There are various microphones available that can connect directly to your iPhone, offering superior sound capture. Here’s an article we have on the best microphones for iPhone.
Step 4: Selecting a Recording App
The default Voice Memos app on iPhone can be used for recording, but for more control over your audio, consider downloading a dedicated recording app. These apps offer features like adjustable input levels and equalization settings.
Step 5: Recording Techniques
When recording, experiment with different distances and angles from the microphone. For whispered content, getting close to the microphone can create an intimate and effective ASMR experience.
Step 6: Editing Your Recording
After recording, use an audio editing app to fine-tune your content. You can adjust levels, cut out unwanted noises, and even add effects if needed.
Step 7: Consistent Testing and Feedback
Finally, listen to your recordings with headphones to ensure the desired ASMR effect is achieved. Don’t hesitate to re-record until you get the perfect take.
Tips for Enhancing Your ASMR Recordings
- Use a pop filter to reduce harsh 'p' and 's' sounds.
- Record multiple takes and choose the best one.
- Be creative with sound triggers – the uniqueness can be quite appealing.
Conclusion
Recording ASMR with an iPhone is not only feasible but can also produce surprisingly professional results. With the right environment, equipment, and techniques, you can create ASMR content that stands out. Remember, the key to great ASMR content is in the subtle details of sound and its ability to trigger a sensory response in the listener. Happy recording!
If you can record ASMR on your iPhone, you can also record a podcast and here is how to do it.
Author

Maxime Levesque is a technical engineer with more than 5 years of professional experience. He is an expert in computer and phones, mostly on Apple products. Maxime is also the founder of TechBrowser.


Post your comment